Showing posts with label rings. Show all posts

Wednesday, March 11, 2015

What is the smallest size coin ring you have seen?

 Quite frankly the smallest size coin rings you generally see are those sized for a woman or a child. Many of those range from about a 2.5 to a 5 or 6.  It is possible to fabricate a US Quarter down to a 5 or 6, but if you need a size smaller than that, I generally recommend starting with a smaller coin - like a dime or a penny.

The other day I was wondering just how small I might be able to forge a coin ring, and still have it look fairly nice. I started with a US Dime (clad), and although I had to resort to using some special tools I do not generally use - I was able to produce a pretty nice coin ring that is "almost" a Size 0 (zero).  It actually turned out to be a Size 1/4.

You can see it and many of the other coin rings I make, at my website and in my store. Stop by and check out all of my coin rings and leave me a comment if you so desire.


Saturday, February 21, 2015

Ever wonder How Coin Rings Are Made?

Jewelry, in the form of rings, have been made from coins for many decades; probably even centuries. You can read more about the history of coin rings here.

Double-sided coin rings have really come along a bit more recently. They get their name from the fact that the coin is forged (or manipulated) in such a way, so as to preserve the details of the coin engraving from both sides of the coin, as well as the "factory" outside edge. A good example  is shown here.

As is true of many crafts, or artistic endeavors; the process of creating a coin ring may range from the simplest of techniques - requiring only a few basic tools, to rather elaborate fabrication methods that involve a wide range of precise and specific jewelry making tools.  Some of the more complex methods involve not only special hand-made tools, but the methods themselves may be proprietary in nature.

Naturally, the end products from these very diverse methods reflect the amount of time, skill, experience and resources that were applied to crafting the specific coin rings. In most all cases, this fact is very evident just from the appearance of the final piece.

In order to gain some first hand knowledge about how a fine coin ring is made, I have compiled a set of instructional videos that were recently released by a single skilled coin ring maker. His name is Skyler Jenkins and his shop name is The Mint - Change You Can Wear. Although these videos go into a fair amount of detail, they really represent a good beginning. Generally, an accomplished coin ring maker will devote many hours of trial and error work before gaining all the necessary nuances of fine coin ring making.

Nevertheless, if you will watch one or more of these videos, I think you will begin to get an appreciation for the amount of time, skill and tools that are necessary to turn out a beautiful coin ring. To get a look at these videos, please sign up here and ask for the link.

Sunday, February 1, 2015

Why is this called The Gamblers Coin Ring?

 The Morgan Silver Dollar, regardless of the year, is a well-known icon of US coinage.  This beautiful coin is 90% silver and when made into a coin ring, results in a very massive and attention-getting piece of jewelry.  Sometimes known as a "gamblers ring", the large ring is always noticed by others and is said to bring the wearer good luck. I am currently running some actual tests on this theory.

When crafting this particular coin ring, I took special time and care to form it into a unique one-of-a-kind piece of jewelry. I make these rings on custom order only, and in sizes from 13 to 18. If you are interested in having me make one for you, please contact me and I will quote you a price and fabrication time.

Friday, January 23, 2015

American Guild of Coin Ring Makers

I am a charter member and founder of the American Guild of Coin Ring Makers. Quite simply this guild is an organization of artisan/craftsmen with the same set of related interests and goals as they pertain to the making of rings from ordinary coinage.  This guild, AGCRM, is organized to maintain standards and to protect the interests of its members.

Friday, January 2, 2015

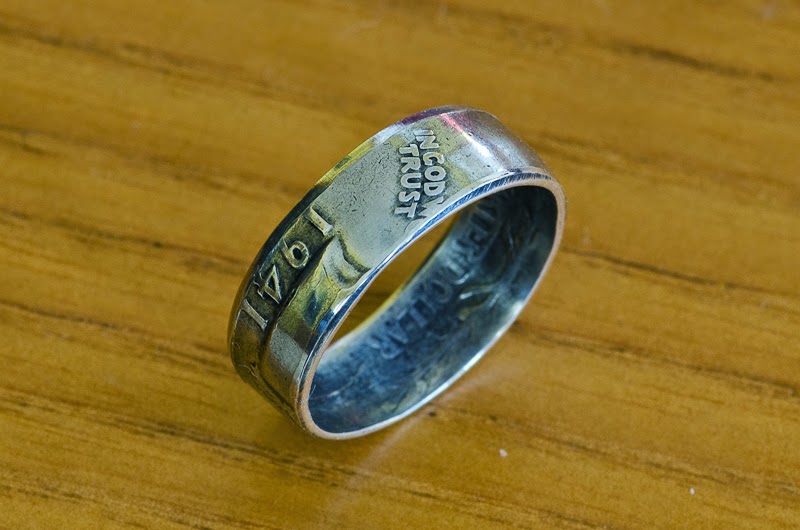
1941 Washington Quarter Silver Coin Ring

 December 7, 1941... a day that will live in infamy. Although this particular US Quarter was a bit worn from all the years it was in circulation; still I felt it was quite worthy of becoming a unique coin ring. On that fateful day, Japanese planes attacked the United States Naval Base at Pearl Harbor in Hawaii. The attack cost the US over 2300 brave souls, and will never be forgotten.

Imagine if this particular coin may have been carried by someone who actually survived the horrific attack. Certainly the date on this coin (1941), marks a very significant milestone in the history of the United States, and of World War II.

Now, as a coin ring, this 90% Silver Washington Quarter can be worn on your finger as a piece of history that can be handed down for generations to come.This coin ring is currently available for purchase from my Ross Coin Rings shop on Etsy.


Saturday, December 20, 2014

Bicentennial Half Dollar Coin Ring

 As I annealed and formed this Kennedy Bicentennial Half Dollar into a beautiful coin ring, I could not help but admire the engraving of the original coin. A true double-sided coin ring, where the details of the original coin remain visible both inside and outside the coin is unique today. Only a scant few coin ring makers know how to create a real double-sided artistic piece. This 1776-1976 US Kennedy Half Dollar is a size 10, and would make a great gift for the man who appreciates a unique coin ring specimen. This ring is currently available from my Etsy shop, as well as several others.


Sunday, November 2, 2014

Tennessee Statehood Coin Ring

Handcrafting a US Statehood Quarter into a beautiful coin ring requires fire, artistic dexterity and some special hand tools. You can read more about the coin rings I create on my Google+ page and my Twitter page.  To purchase one of my rings visit Ross Coin Rings.

Tuesday, October 14, 2014

How To Make Double-Sided Coin Rings - #4

The next step in the creation of a double-sided coin ring is a process known as annealing the coin, in order to soften it. Annealing the coin is where you hold the coin in the flame of a propane torch until it just begins to glow. If the coin is copper, bronze or nickel-copper clad, you need to heat it up until it glows a bright cherry red. If the coin is Silver or 90% Silver it only needs to turn a dark red color. Generally, this step is done in a darkened or semi-darkened room in order to see the color changes more easily. A pair of locking forceps or jewelers tweezers are used to hold the coin in the flame.

Once the correct color is reached, remove it from the flame and let it cool naturally for a few seconds; then dunk it in a small container of water in order to finish cooling it to a point where you can safely handle it. (This annealing step will need to be repeated several times until the final shape is achieved.) Please note the annealing step will cause the coin to end up with a blackish (or brownish) scale after annealing. This is normal, and it will be used to create highlights during the final finishing and polishing step.

With the coin annealed, slip it over the small end of your ring mandrel. If you have drilled or punched a hole approximately 1/2" in diameter, it should just fit over the tip of the mandrel. Using your composition hammer (plastic, leather or nylon) begin hammering the edge of the coin, causing it to bend down and move down the mandrel. Do this lightly at first, because the coin is very soft. Try to hammer evenly around the entire perimeter of the coin. Gradually, the coin will begin to fold down closer to the mandrel, and will resemble a cone shape. As you hammer the coin, the metal will "work harden" and eventually you will need to repeat the annealing step. After you remove the coin the first time, you will want to file the cut edge until it is fairly smooth all around. This will keep the coin from splitting as you continue forming it down the mandrel.

Keep repeating this hammering step and annealing step until the outside perimeter of the coin is nearly touching the surface of the mandrel.

Anneal the coin once more. This time when you put it on the mandrel; place it so the cone shape is the reverse of how you have been placing it on the mandrel. That is with the large end of the cone facing up instead of down.  Now, keep hammering the perimeter of the coin until it flattens against the outside of the mandrel. Keep in mind you may have to anneal it again before it can be flattened completely against the mandrel.

In the next posting I will explain how to finish the coin ring.


Saturday, October 11, 2014

How To Make Double-Sided Coin Rings - #3

Now that you have a list of the basic tools you will need, I will next elaborate some on how you will use them.

To begin with the fabrication of your coin ring, you will need to remove a small amount of material from the center of your chosen coin. The size of the hole will usually be just large enough so that it will fit over the small end of your tapered steel mandrel.  Most common ring mandrels will require that the hole be around 7/16" to 1/2". If the final ring size you are trying for will be a size 9 or larger, then generally you could make the hole in the coin a bit larger than 1/2". As you gain more experience, you will learn better how much material needs to be removed to achieve a certain ring size.

Some will anneal (soften) the coin before attempting to drill or punch the hole.  Again, it depends a little on the type of material the coin is made out of whether you will need to anneal it first. In most instances, you will not need to anneal the coin first. The hole in the coin can be done in essentially two different ways. You can either punch the hole with a punch and die set, or you can drill the hole using a powered hand drill or a small bench mounted drill press. After drilling or punching the hole, usually the cut edges will require a little deburring. This can be done with a small rat-tail file.

The placement of the hole should ideally be as near as possible to the exact dead center of the coin. There are several methods for locating the center of your coin, and here is one. However, DO NOT obsess over the placement of the hole, if it does not end up exactly in the center. There are at least two ways to fix a hole that is slightly off center.

Here are the two ways to fix the hole in the coin if it is slightly off center.
  1. The first involves using a small rat-tail file to remove metal around the hole on the side where it is the thickest. You can usually do this by eye, or you can use a calipers to measure the distance from the outside edge of the coin to the inside edge of the hole.
  2. The second way is to wait until you start forming the coin down the mandrel. As the coin is being formed you will notice that one side of the ring is thicker than the opposite side. Using a flat file you can remove material from the edge of the hole where it is the thickest, until the width of the sides are more even.
In the next posting I will discuss the first annealing and initial forming of the coin on the mandrel.

Friday, October 10, 2014

How To Make Double-Sided Coin Rings - #2

The entire basic concept of creating a double-sided coin ring revolves around starting with a flat object (a coin), and transforming it to a circular ring shaped object. The transformation will result in the features on one side of the coin to be visible on the outside of the ring band; while the features on the other side of the coin are visible on the inside of the ring.  Refer to the picture here as an example.

There are four basic steps to achieve this transformation from coin to ring. They are listed below:
  • Removing some metal from the center of the coin
  • Softening the metal (annealing)
  • Shaping or forming the metal
  • Finishing and polishing
Each of the four steps above, involve certain basic tools in order to complete the process.  The following list represents the minimum set of tools. It should be noted that although each coin ring craftsman start out with this minimum set of tools; as they gain experience, develop and refine their own techniques and methods, generally they will add other tools to suit their own needs.

The basic set of tools involve the following:
  • A metal punch or drill (or both)
  • Small propane torch
  • Small selection of metal files, ie. rat-tail, flat mill bastard
  • A nylon, leather or plastic hammer
  • A hardened steel tapered mandrel
  • Two or three different grits of sand paper and some steel wool
  • Metal polish and/or metal polishing cloth
In the next part of this instructional material, I will cover how these basic tools are used to create a coin ring.


Thursday, October 9, 2014

Token From The House on The Rock

 The House on The Rock is located in Spring Green, Wisconsin. These tokens make excellent coin rings and forever will remind the wearer of their visit to this unique bit of modern architecture. Visit Ross Coin Rings to see other examples of my work.


Monday, October 6, 2014

Tennessee Statehood Coin Ring


If you are looking for a petite coin ring for that special gift, this may just be the ring for you. This ring is sized at a 4-1/2 and is custom crafted from a clad US Statehood Quarter. To order this ring, or any of the other coin rings in my shop; just click on this link.

How To Make Double-Sided Coin Rings - Intro

Making coin rings out of ordinary currency, be it US or foreign coinage, is becoming a very popular hobby. However, only a scant handful of all these fabricators could actually be considered artisan craftsmen (and women).

Probably you will not be able to completely learn this craft just by reading about it. Nevertheless, for those who really have no idea where to start - perhaps I can give you a good start by sharing some basic information.

This first posting is merely my introduction to the information I will be sharing. In order to keep these postings from becoming excessively long; I will try to cover only one facet of the process in each posting.  Stop back often to read all of the postings and thus gain the knowledge to get started making your own coin rings.  Each posting will have the phrase "How To Make Double-Sided Coin Rings" in the title.  That way you can keep track of what you have read, and recognize when I have added something new.

Tuesday, September 30, 2014

Neat Old Foreign Coin Ring

Today I added a really neat coin ring to the shop.  I made it from an old British Half Penny coin. The material is bronze, and as you can see from the pictures, it made a unique and beautiful ring. The date is clearly seen on the outside of the band as the year 1933.

On January 5, 1933, work on the Golden Gate Bridge began and just one day later, on January 6, famous bank robber Clyde Barrow shot and killed Tarrant County Deputy Sheriff Malcolm Davis. Towards the end of 1933, the great Black Blizzard snowstorm-duststorm raged from South Dakota to the Atlantic.

Check out this latest addition to the coin rings I have on hand, and are available for immediate delivery.

Saturday, September 27, 2014

Newly Revised Shop Page

My Ross Coin Rings website has a newly revised Shop page. Each coin ring that is in stock and available for immediate delivery is listed separately with a photo, a short description and a Buy Now button. Shipping is free within the USA. This revised page should make it a lot easier to browse what I have in stock and place an order while you are on that page.

Although I have a good variety of my in-stock coin rings listed, there are still a few that are not listed yet.  I'm working on completing this page. In the meantime, if you want something that is not listed yet, contact me by Email and I will let you know if I have it on hand or could make it for you.

Wednesday, September 24, 2014

Nevada US State Quarter Coin Ring

This US State Quarter commemorating Nevada statehood in the year 1864 was recently transformed by me into this beautiful coin ring.  Although it appears large in the photos, this coin ring was purposely crafted to be a Size 4, thereby giving me the opportunity to exhibit large portions of the elegant engraving embodied on the surface of this particular coin.

This ring is currently available for immediate shipment from my website at Ross Coin Rings, and even if it is too small to fit your finger, it could always be put on a small chain and worn as a
stylish pendant. 

Sunday, September 21, 2014

Not All Coin Rings Are Quality Products

It is interesting to me when I see so many "wanna-be" coin ring makers attempting to peddle their initial products to the public. Seems just about every hobbyist that views the typical YouTube instructional video decides they will capitalize on the hobby by quickly hammering out a ring and selling it on eBay. Unfortunately, it is really not that simple to produce a quality piece of jewelry that will exhibit the true mark of an artistic craftsman.

Here is just one example (picture) of what I am talking about. The typical hobbyist, armed only with a plastic hammer, a ring mandrel and a flat file, can generally hammer the edges of a quarter over the tapered mandrel in a matter of a few minutes. Then they file some of the sharp corners with a rasp file and Presto! their ring is ready for the auction block on eBay. This is hardly the work of a true artistic craftsman; and it definitely shows.

Of all the many coin ring makers today, there are really only a very few artistic craftsmen that take pride in the time and effort that goes into each piece they create. In addition the recipient/customer can easily appreciate the work that resulted in a beautiful and elegant piece of handcrafted jewelry, and themselves are proud to wear and show it off.

Certainly, a handsomely crafted coin ring requires a wide range of hand tools; not just a hammer, a mandrel and a file. But more importantly, a quality crafted coin ring is really the culmination of a great deal of time and experience, not just a tool set. The time expended in order to hone artistic skills is usually measured in years, not minutes or days. Of course natural talent plays an important role in the development of any artistic endeavor. For me personally, my interest in expressing myself artistically started to emerge when I was in grade school. And, looking back over all the intervening years, the bulk of my endeavors centered around crafts and hobbies involving some form of artistic expression.

Each coin ring I produce involves a great deal of time and concentration because it must first satisfy my own high standards for quality, beauty and elegance. Only then am I confident that it will be representative as a coin ring crafted by me... Ross of Ross Coin Rings.

Saturday, September 13, 2014

What do Coin Rings and the NSA have in common?

NSA are the initials for a government organization known as the National Security Agency.  They are located on the edge of Ft. Geo G. Meade in Maryland. The National Security Agency/Central Security Service (NSA/CSS) is home to America's codemakers and codebreakers. By its very nature, what NSA/CSS does as a key member of the Intelligence Community requires a high degree of confidentiality. The NSA could easily be thought of as the most secret government organization in all the USA.

Probably you are not seeing any obvious links between the NSA and the "art" of crafting coin rings.  Well, when I first got interested in learning how to make a ring from a coin - I had no idea that I was about to enter a world of "black art" and closely guarded secrets, similar at least in nature to the NSA.

Nevertheless, as I probed the Internet to learn what knowledge was available to me; it did not take me long to figure out that only a small handful of coin ring makers actually know the secret  "guarded fabrication techniques" - and NONE of them were divulging any of their special techniques, tools and methods.  Similar I guess to the way craftsmen at craft shows guard and protect their methods and designs. Now, of course if you look on YouTube, you will find a nice selection of videos, wherein it "appears" the authors are explaining how to make a ring from a piece of currency.  In ALL the videos I've seen; they all plainly describe what I would call The Hammer and Mandrel Technique. Further, the unsuspecting novice has not a clue that what they are being taught is really a very primitive and basic method; quite common knowledge throughout the Internet, and has been for several years.

And, if the novice follows this "common" technique (to the letter), their resultant coin rings will come out looking like 95% of the coin rings you see for sale on Etsy, Ebay and other sites on the Internet.  However, the other 5% of the coin rings, made by that handful of coin ring makers, that know the secret "guarded fabrication techniques", look NOTHING like the other 95%.  Their coin rings look beautiful, most have a rounded or domed shape and are perfectly finished. While the other 95% have been made with the "hammer and mandrel technique", and come out having a definite cone or wedge shape (such as the one pictured here), they retain details on the outside but very few on the inside and a finish that is only mediocre at best. Naturally, most of the 95% would like to know the secrets used by the 5%. And therein lies the problem (for the 95%) - the 5% ain't talking; kind of like the folks that work for the NSA.

Now for most of the 95%, they still turn out their "kind" of coin rings. They sell a few now and again, but they also end up giving them away. Then there are a few of us, new to the craft, that are determined to learn the secret techniques (and tools), either from someone who leaks them to us, or merely by our own trials and errors. You see, to a few of us determined individuals, finding out that "hidden information" is keeping us from turning out a more admirable product is like pouring gasoline on a fire. It just makes us all that much more determined and resolute in our quest for "the holy grail" - so to speak. And, no matter which way we learn the "secrets"; it is hard-fought for information, hence we become part of the 5%, with our lips sealed, and the saga continues. 

It is interesting really to see the lengths that some will go to in order to keep their secrets from becoming known. I'm pretty sure I could never stoop this low but here is just one example that I know of, and I'm sure there are others. One of the "senior" members of that 5% group actually puts out instructional videos (YouTube) and other information on his blog. When a novice finds this information, and views the videos, they truly believe what they are being told. They follow the instructions to the letter, because the coin rings this fellow sells are beautiful. Yet, when they follow the instructions and the videos, they always end up with a sub-standard result; kind of like the one pictured above. Do you know why they can never get the "beautiful" result?  It is quite simple really; this particular maker holds back his secret techniques, tools and methods. All he really gives out is the same old Hammer and Mandrel Technique. That way, no matter how closely the novice follows his instructions - they can NEVER produce anything but a sub-standard coin ring.  Thus, that senior member of the 5% has protected his secret for all time. That is kind of an extreme case of protecting the secret techniques and tools.  But, I suppose it is cheaper than applying for a US Patent.

Some of the others belonging to the 5% merely get on discussion boards, or post video instructions where they pretend to give out some information, but in reality they are not sharing anything that cannot be found in hundreds of other places on the Internet, and are really excerpts, bits and pieces of the Hammer and Mandrel Technique.   Or, sometimes I've seen them just taunt the novice coin ring maker by showing them some really beautiful coin rings and then brag that they know the "secrets" and they are not giving them up.

Well, now you know what Coin Rings and the NSA have in common.  They are both very secret organizations.  So, in reading this particular posting, did you discern which group (5% or 95%) I am in?  Well, certainly I started out in the 95% group - but today I could be in the 5% group. I can't really divulge any more than that.... sorry... <grin>.


Friday, September 12, 2014

New Addition to my Stock On Hand


Yesterday I finished up a nice US Statehood Quarter (Clad) for the State of New Mexico. I think the details of this particular coin are quite distinctive. The Size is 5-1/2.

You can find this ring along with the others I have on hand at my new website.

Wednesday, September 10, 2014

Ross Coin Rings Website Now Online

After working almost all day yesterday, the RossCoinRings.com website is up and running. Just a few little tweaks perhaps, but I would say it is now about 98% completed.  At least all the major pages are indexed and seem to be running smoothly.

With that chore out of the way, now I can get back to actually making more coin rings, and building up the stock on-hand.

I want to thank everyone that have recently shown an interest in my coin rings, including those I spoke with yesterday at breakfast. If you will visit my website, you will find the latest photographs of some of my rings, as well as an opportunity to contact me with what you are interested in.